
One Arm Handstand Lessons From a Chinese Acrobat

You can also view a short accompanying video here. (It shows a sweeping shot of the facility)
This post will attempt to convey all that I was taught during my visit to the Philadelphia School of Circus Arts. I traveled up there for more training information for the one arm handstand. While I’ve come a long way in my one arm handstand training, my holds are still only topping out at 3 or 4 seconds. I’ve seen acrobats holding one arm handstands much, much longer than that. I needed a new view on the skill to advance my training!
Now everything that I’ve written here is by no means a complete system, and certain points may not apply to you. I’ve recorded all the information I was given that day to the best of my abilities. I’ve also given my own thoughts about the advice and techniques presented to me. I apologize if I’ve written or interpreted any information incorrectly. This is a process for me. One that I enjoy and one that I hope you enjoy reading!
——————–
I’ve often heard the saying “when one is ready, a master will present themselves.” I say this is wrong. I say there are times you need to search out for your master.
I caught a video online from the Philly Circus School and soon after scheduled a private session with Lin Junming. His bio states:
“From the Fujian Acrobatics Group of China, Lin has practiced and coached acrobatics and juggling for 20 years. With the troupe, he performed in circuses all over the world; Europe, the Middle East, Africa and Asia. He specializes in handstands and tumbling, ring juggling, straw-hat juggling, ultimate wheel, rope-twirling, and Chinese pole.”
If anyone can help me with my one arm handstand – it’ll be him!
The Initial Assessment
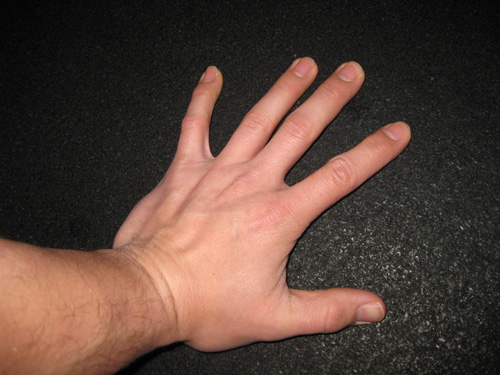
Lin first asked me to show him my handstand. After showing him a solid two arm handstand, he told me that I needed to use my fingers more. “Don’t forget the fingers!!”, he would repeat throughout the lesson. Instead of a position like this –

He said I should practice my handstands like this –
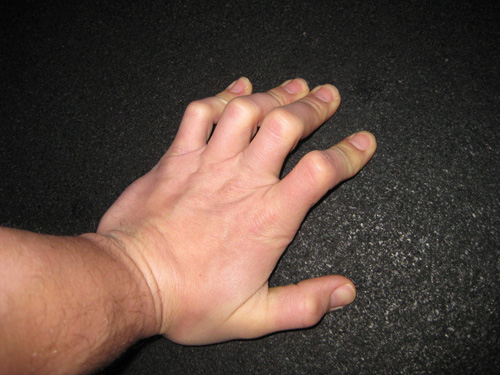
Now this was nothing I had ever been taught before. One can hold a two arm handstand just fine with the hands flat on the ground, and pressing your fingers into the ground. He says in Chinese acrobatics though, the handstands are practiced like this to strengthen the fingers; the ultimate goal being the ability to do a handstand on another person.
I looked back at old tutorials, and noticed that a picture of a Chinese acrobat in my one arm elbow lever tutorial seems to use this same technique – grabbing into the ground.

Again, I can’t say I’ve ever been taught to use the hands and fingers specifically like this, but it makes sense as a variation. I can use my fingers to dig hard into the ground – which certainly must be useful for the one arm handstand.
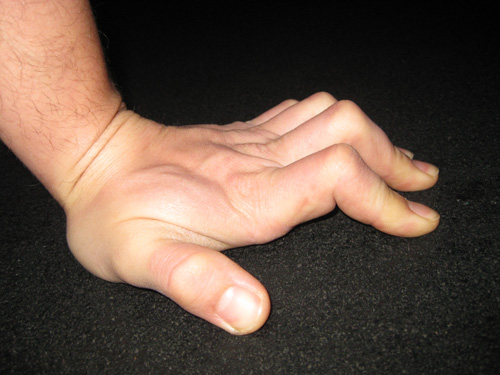
Lin also said something very interesting. He said that when the hand is flat, you have two points that you’re balancing between – the palm and the fingers. When the fingers are curled up, you feel the balance between the palm, the first knuckle (where the finger meets the palm) and the fingers (finger tips) – three points. I found this a very interesting observation. I’m still not sure if I fully understand it at the moment, but will ponder it during practice.
After practicing handstands with the curled fingers, Lin motioned, using two hands to delineate the distance from my mid-forearm to my shoulder, “This is very strong”, he said. Then he motioned around my hands, “This, not so strong”.
What!?!
I’ve deadlifted 500 lbs, done one arm chin-ups, closed an Ironmind 2.5 gripper, and picked up a 45 lb plate by the hub. I don’t slack off with grip work, but my fingers weren’t conditioned for the specific handstand position shown above. I could already tell that this was going to change my handstand training.
Handstands on Blocks
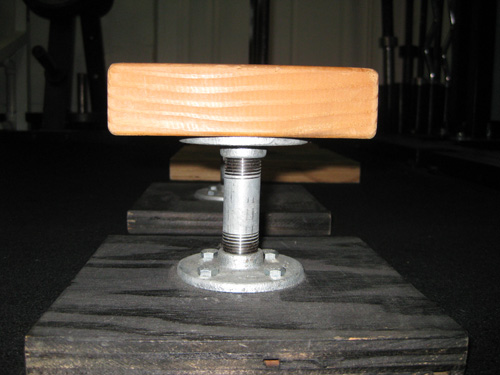
I’ve often heard that working the one arm handstand on handbalancing blocks (a.k.a. canes) is easier. What are they? Well, here are two different sets that I’ve acquired over the years.

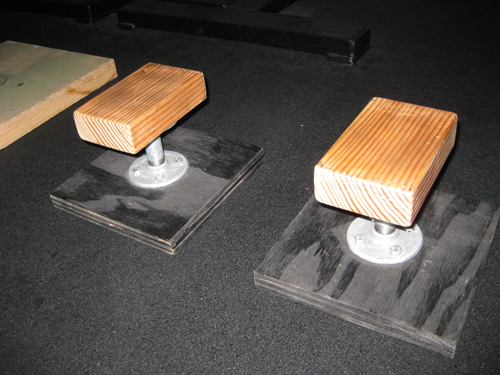
I’ll go over the differences of each pair later, but just note that they’re essentially elevated wooden blocks on which you perform handstands.
After the discussion with Lin over finger strength and positioning, I can see how these would make the process easier and a handstand stronger. You can grab the block and control the handstand with a much greater degree than on the flat ground. This is similar to the added control one gets when a handstand is done on parallettes
Picture explaining the balance on parallettes. From my freestanding handstand pushup tutorial.
One can “fight” to hold the handstand up with much greater leverage and force.
I have now been using the blocks for all my handbalancing practice. I’m am looking to see if it develops the strength and control in my fingers to hold a longer one arm handstand.
Now you may have noticed a difference in the two different pairs of handbalancing canes that I just showed, other than the obvious difference in height.
One pair has sloped blocks.

One pair has flat, square blocks.
There was a pair of sloped handbalancing canes at the Philly Circus School. When I asked why they were sloped, Lin responded that they were for more advanced students and that usually beginners would start out on the flat blocks. I find the flat blocks to be much more comfortable and intuitive to use.
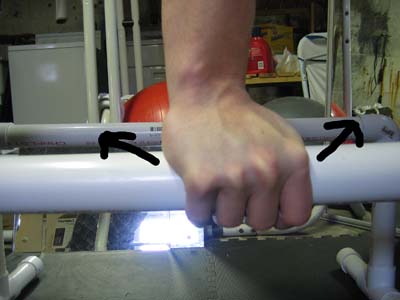
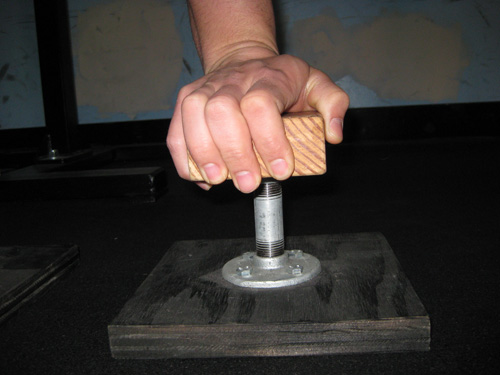
To replicate the flat blocks, Lin had me practice up on a wooden bench.
You can see how my fingers wrap over the edge. The fingers are then able to pull back into the bench and grab on.

The small wooden bench was a very interesting piece of training equipment that I’ll touch upon later in this post.
Back to the finger technique, and to replicate this on my own blocks, I can put my hand in a similar position, with three fingers off the front edge of the block, and my thumb and little finger off the sides.
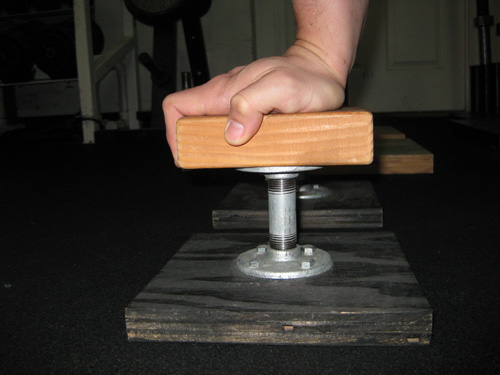
correct hand position
Lin mentioned that the hand is not wrapped around completely, as this reduces the amount of support provided by the hand.

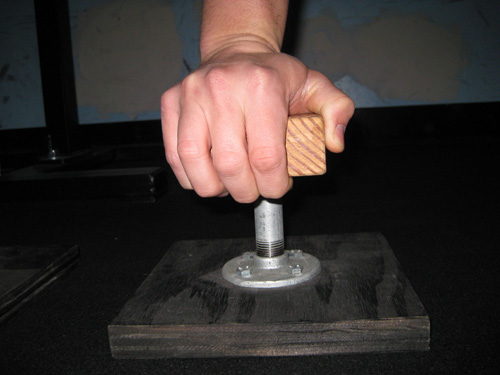
wrong hand position
From the side shot above, it becomes clearer how this would reduce the amount that your hand is contacting with the top of the block, making the balance unnecessarily difficult.
In an amazing video that I recently saw of acrobat Willy Weldens, his one arm handstand technique seems to back up the hand position that I’ve been recently taught and have been practicing. Here are some screen shots that thankfully show his hand up-close for analysis.
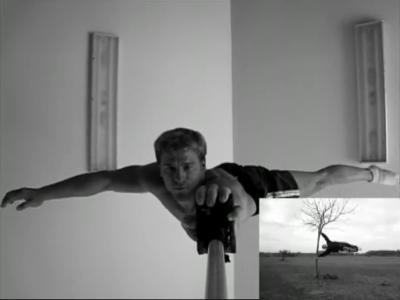
From below, it looks like his hands wrap around completey (as I’ve been told not to do), but from the side, you can see this is simply a matter of working on a thinner block then I have. He his able to get that last finger joint around the underside of the block. The same amount of hand appears to be on top of the block.
So the conclusion seems to be that you want your palm and the first bone of your index, middle, and ring finger up on top of the block. The rest of those fingers are on the front or underside of your blocks (depending on the thickness of the blocks). With a thicker block, I am focusing on pulling my fingers into the block, not just pressing my hands down. This action made more sense after working the next exercise…
Handstand Walking
Besides work on the blocks, or holding the handstand with fingers curled up, it was also suggested that I practice walking on my hands.
Now I can walk on my hands quite well, but I was told to walk with my fingers facing forward, and place my hands down flat as I have normally done, but after each hand was placed flat, I was to curl my fingers back like I have previously shown
Each step was to repeat this process – hand down flat, curl fingers, try to momentarily balance on one hand as the other hand moves forward. repeat. This produced a new type of fatigue in my hands which felt very productive.
While doing a search for Chinese Acrobatics, I found this interesting photo of young Chinese Acrobats walking. I could see curled fingers on several of the youngsters –
http://ryanpyle.photoshelter.com/image/I0000VOlbChyNRZ8
I also noted all the kids against the wall. Which leads to the next part of the lesson.
Benchmarks
For all the different holds and exercises that Lin showed me, Lin told me the amount of time that one was expected to hold each position or perform each exercise:
Two handed handstand against the wall (with curled fingers) – 10-15 minutes
One arm handstand against the wall (with assist from other hand) – 5 minutes
– In this exercise, my feet were resting against the wall and my assisting hand was up on the wooden bench that you saw in the picture above. I was to put as little supporting on the assisting hand as possible.
Freestanding one arm handstand with assist – 5 minutes
– Same exercise as above, but no wall.
Distance to walk on your hands – “2-3 laps total”, Lin said. For the space we’re in, I’d equate this to walking around the perimeter of a basketball court.
At this point you’re probably wondering how you could possibly ever hope to hold those positions for that period of time. I’ll give you two comments about those purported times. First was a warning from my client that he received from his doctor in regards to using an inversion table. His doctor told him that it was very dangerous to fall asleep upside-down in an inversion table, due to the fact that the body will have a difficult time pumping the blood out of the head and serious injuries could result. Do I think that someone will accidentally hold a handstand for 15 minutes? No, but it’s something to consider.
The second warning was from a respected acrobat I spoke with after my visit. They said that in all their experiences they have never seen or heard an acrobat hold a skill for those times. That hold times that long may not be necessary. Also that the method of holding skills for extremely long periods of time may work for children, but often produces injuries in adults.
What is my take? I do believe that longer static holds against the wall will aid in longer freestanding holds, but I think it best not to go overboard. Working a static hold a minute or two at the most will give you more than enough strength to hold the freestanding skill for a decent time. After that, I feel that you can focus more on figuring out the balance – which is much harder than just gutting out a long, supported hold.
Bench Exercises
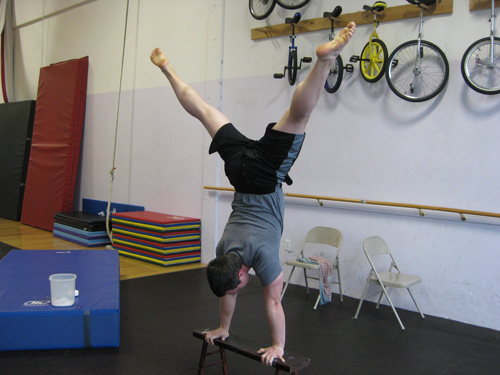
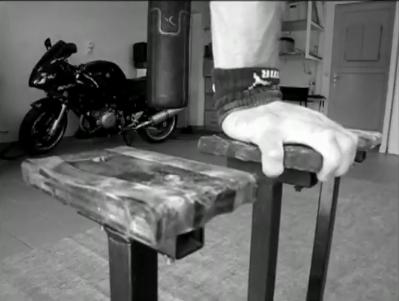
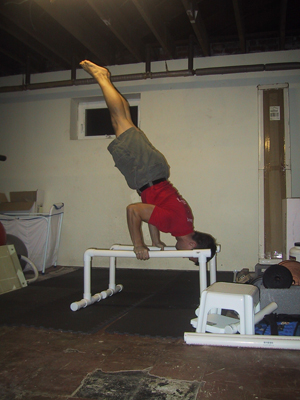
As I mentioned before, we used the small bench you see pictured above for several different exercises. I found it an interesting piece of equipment that was similar in use to a set of parallettes.
There were regular one arm and two arm handstand holds on the bench, as you see above. We also did wall-supported and freestanding handstand pushups on the bench.
I’ve done a large number of seminars now, and the one thing that I see wrong in everyone’s handstand pushups is that their elbows flare out to the side, instead of staying slightly tucked in. Flaring out the elbows puts the hands and arms at an inefficient pressing angle, and makes full range handstand pushups very difficult.
If you’re not sure whether your elbows are flaring out or not, check to see if your hands remain flat on the parellettes during full range handstand pushup work –
Of course, you can do the same exercise in a pike position with your feet on a bench/box to make it easier, but what should remain the same is that the hands are flat on the parallettes. If it feels like you’re rolling onto the side of your hands, then your elbows are probably flaring out. Think of the handstand pushup like an overhead barbell press, and keep your elbows slightly tucked in both cases.
Now with full range handstand pushups on the parallettes, people will flare their elbows and their head will go down directly between their hands. At this point they then get stuck. With a bench, there’s no possible way that your head will go down directly between your hands. You’re forced to move your head and shoulders forward of the bench to get a full range of motion – and the elbows absolutely have to remain tucked! I think using the bench could fix a lot of people’s problems with that issue.
For freestanding handstand pushups on the bench, Lin also had me fold my body into a pike position when I descended to the bench, and then straighten my body back out as I pressed out. He said that for beginners, this leg movement could be used to give momentum and help press the skill out. For the advanced handbalancer, it can get them more accustomed to controlling extra body movement in a handstand.
Specifics
While I had Lin’s time, I asked him absolutely everything about the one arm handstand that I could think about. There are probably more questions that answers here, but I will enjoy exploring those questions. Here are those miscellaneous notes –
Balance in the one arm handstand
– I was told that the balance should still be more focused on front and back. Do not twist or move sideways too much, as that’s for the more advanced handbalancers. I have always twisted slightly as I shifted over to my supporting hand. I also twist out of my one arm handstand often, so perhaps this is to blame?
Legs
-They should be kept as straight as possible, again minimize the twist at first.
Frequency of workouts
– The Chinese acrobats would practice nearly every day, and more frequent practice will allow faster progress. Of course many of us are balancing other training aspects, so he said 3x/week to start is good. I look for 2-3x/week, at least, on days/times that I feel fresh.
Breathing
– We should hold our breath when stopping the handstand, when we are over-balanced and fighting for balance. Breath again when we are back under control. This makes complete sense, as I think all of us instinctually hold our breath when we are kicking up into the handstand. Of course, we also need to remember to start breathing regularly again!
– When doing any movement in the handstand, hold breath for control.
Eyes
– During practice, I mentioned that I would focus on a single spot on the ground, hoping that this would help with my focus and balance. Lin said to just look at the ground in general, that focusing on a very small, specific spot should not be necessary and that where I was looking would matter less in time.
– I have wondered whether more blindfolded two arm and one arm handstand work is a possible way to “feel” the balance of the handstand quicker.
Conclusion
I’d like to thank Lin and the Philadelphia School of Circus Arts again for everything! It was an excellent trip and very informative. So what have I learned and what am I applying to my training?
I’ve been working my handstands on the blocks now, to work the fingers as Lin emphasized. I have also been working the hand walking/finger curling exercise, which feels like it works the hands quite well. And finally, while I haven’t been working to hold a handstand for 15 minutes, I have been working to hold my one arm assisted handstand (on blocks), for longer periods of time.
As I said, this is an ongoing process. If you have any words of experience, or resources/teachers to check out, then let me know in the comments! Thanks!
-Jim
Hi! really nice and helpful post, I enjoyed it a lot.
Ha! Those pictures are hilarious! LOVE EM!