Freestanding Handstand Pushups
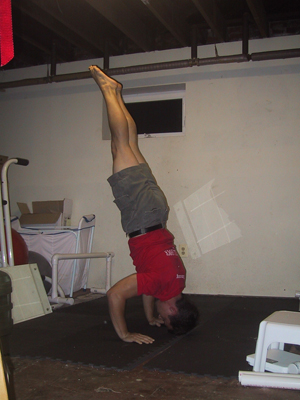
Now is the time to put together two skills you’ve been working on – the handstand and the handstand pushup. You may do both flawlessly, but putting them together and maintaining balance throughout the whole pushup will take a bit of practice.
First, it goes without saying that your handstand should be solid. You should have it for 15-20 seconds, at least, and be able to use your fingers proficiently to balance yourself. If you can’t keep yourself in one spot for an extended period of time, I would focus on training that before you try the pushup.
Next, you’ll need to be strong in your handstand pushup. Now you don’t need to be cranking out a dozen handstand pushups against the wall, but the stronger you are in this movement, the easier the freestanding handstand pushup will be. The challenge in this skill should be balancing yourself, not struggling just to press. Take care of the strength aspect and you’ll find balancing will be much easier.


Start off by kicking into your handstand of choice, arched or straight, makes no difference to me. Both will be difficult and will have a slightly different feel to them.
LOWERING DOWN
.jpg)
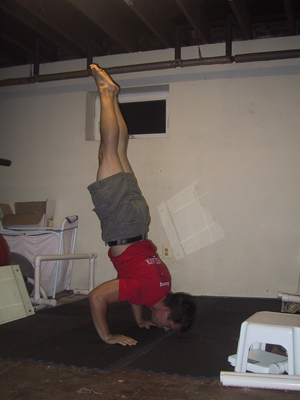
Now here is the step where you want to bend your arms and lower yourself to the good earth. Things will look slightly different depending on how arched or straight your handstand is. You could even flop your legs over if you’d like, although this looks horrible.
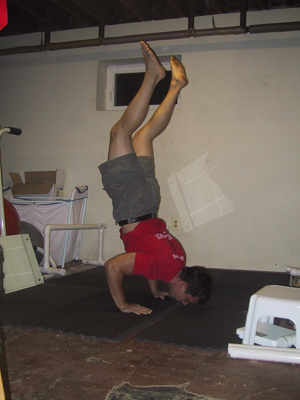
I’ll just go point by point on the various body parts and what I generally focus on.
Head – touch your face or top of head to the ground, depending on how arched you are and what position you head is in. Not much to say here except be careful and don’t headbutt the concrete. So lower yourself under control.
Hands – weight should be more towards the fingers, as they offer greater control. If you body weight is shifting more towards the bottom of your palms then you’ll probably find yourself falling out of the handstand to your feet, especially during the pushup.
Arms – keep your elbows in and bend them like in the picture. This will feel much stronger and more natural than flaring your elbows out to the side. I always thought this position felt the most natural, so it may not require any thought from you.
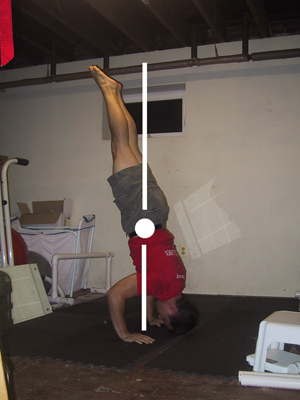
Torso and legs – again, depending on how much arch you have in your handstand, this will look slightly different. What I can say is that your body will be at a slight angle, so that when your arms bend and your shoulders and head move forward and down, your torso and legs will counter-balancing by staying to the other side of your center of gravity, which pretty much lines up with your fingers, as shown below.
THE PUSHUP
Here’s where you find out if you’ve got it or not. All the advice I could possibly give right now won’t take the place of simply getting out there and practicing the skill. You’ll need to work and develop the balance along the entire range of motion. I do have several comments that may help some common problems I encountered –
- Keep your weight over your fingers! Again, this is where the control lies and you should definitely feel in control the entire time. If you find yourself falling back down to your feet when pressing (the most common problem I encountered) then it’s a result of not keeping over your fingers, lack of strength, or both.
- Keep your body still. The only motion should be in your elbows and shoulders. If you feet and legs are moving about, it only makes things harder.
- If you can only lower yourself down, but can’t press up, don’t worry! Work the negative motion and try to press up a little higher with each try.
If all goes well, you’re back up in the handstand.
.jpg)
GOING BEYOND
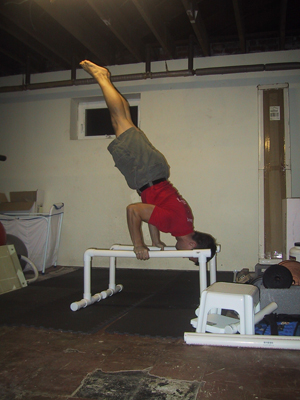
Just like the basic handstand pushup, the freestanding handstand pushup can be made harder with parallettes. The extra depth can be quite a challenge, and I recommend a straight body for the entire exercise. This will help prevent you from going over your back, which can be hard to turn out of when you are at the bottom of the repetition.
Control and balance on the parallettes is all a matter of using your wrists.
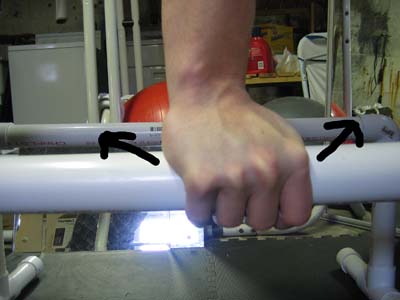
Instead of finger pressing for control, as with the handstand, you are now flexing your wrists either toward your thumb or toward your pinky. In some ways balancing on the parallettes is easier because you have push and control in both directions, as opposed to the handstand on the ground where you can only push with your fingers.
Good luck with this skill. If you already have the two rudimentary skills of the handstand and handstand pushup, then this should come together relatively easy.


My goal is to be able to do freestanding handstand pushups easily. My friend actually got me into doing calisthenics about 3 1/2 months ago and I have progressed tremendously. The question I’m asking is would handstand pushups against the help my freestanding ones?
hey,today I tried my free handstand pushups after reading this article.I have been doing calisthenics for about 5 months,no gymnastic background nor any experience in weight lifting and because of that I find this skill very hard to do.I can lower myself all the way down and push myself all the way up but the problem is that my legs straddles and bends automatically and the form gets really bad,especially there is an arch on my back.I can do 1-2 free HSPUs with banana handstand form no more than that.Do you think I should keep doing it with bad form or should I first get down the straight handstand for better results? let me know
regards.
Fahim
Hi.
Is this still active?
Then I have a few lil issues performing this. Maybe you or one of the viewers can help me.
– When upside down, blood flows to my head real fast, and pressure builds. This is not nice to experience and it prevents me from being in the hand-stand position for like longer than 15 seconds. Is this normal, can it adapt? And is there anything to do about it?
– Why are you keeping your legs parallel to eachoter? Isn’t your legs apart not easier, and more stylo?
Thanks!
Make sure to breathe while upside-down, and only work until you feel strong. You will get stronger and able to hold the inverted position longer.
I keep my legs together. You can put them however you want, as long as you stay balanced.